
Going on Vacation
עברית למטה Hi Quilters! I know it’s been a really long time since I’ve posted anything. It’s been a hard, sad, scary and crazy year


We are going away on vacation next week. We are spending 3 weeks in the States, including 3 Shabbatot. The first one we are spending in a house in Orlando, the next one will be in Potomac, at a friend of my son’s and the third one will be at my cousin’s in Huntington, Long Island.
We go to Hunting for a Shabbat practically every time we are in the US. I always bring a gift made in Israel. Instead of buying it this year, I decided to make it. (It’s still from Israel, right?)
After going to the workshop run by the Israel Quilt Association, I decided to try my hand at making something using some of the techniques that I learned.
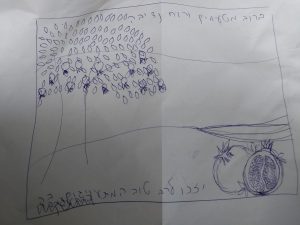 I always like to bring different things every time that we go to the cousins, and I wanted to make something, so I figured a plata cover was the way to go. After talking it over with one of my daughters, we came up with a design that we liked and I sketched it out. The next step was going through my stash picking the fabrics. That is always a daunting task for me. Luckily my daughters were there to hold my hand and I think they came up with a great color scheme.
I pieced the back of the plata cover in 4 sections, the same way that I did for the tulips that I made in the workshop. What I did was draw out the what I wanted on a very large piece of cardboard. I started by measuring out 31″ x 26″, the site of a standard plata cover, and then drew on the background sections that I wanted. Then I cut it up and marked the fabric for each section on the wrong side of the fabric. When I cut, I added a quarter inch seam allowance.
The background fabrics are layered one on top of the other, instead of just sewn together on the quarter inch seam. I chose which fabric that I wanted to be the top fabric, and I iron it down on the quarter inch. Then I top stitched with with invisible thread with a zigzag stitch. That kept it together nicely.
I used heat bond fusible web to add the other parts on top of the background. I drew the tree trunk and pomegranates on the paper side of the web, and then I ironed it on to the back of the fabric. One thing to remember – you need a mirror image of what you want to show on the quilt, so take that into account when you draw.
For the leaves, I just ironed the fusible web onto the fabric, and then cut out leaf shapes, without marking anything first. I like doing it like that because I think it give more of a natural look. It also take way less time then drawing every leaf and cutting them out on those lines. I was able to get all my leaves cut while watching a TV show.
 The letters were a bit more tricky because I wanted them to be more perfect. (Not that they are perfect, but they are a bit more perfect than the leaves.) I printed the text the size that I liked on regular paper. It was dark and I could easily see through the paper, so I decided to iron a piece of web on the back of the fabric and then glue them on, using a glue stick, so they were backwards when I looked at them onto the paper side of the fusible web. I then, very carefully cut out the letters. To make sure that I didn’t lose any of them, I used binding clips for each word to make surer that everything was kept together.
Next time I do lettering, I think I’m going to use a stencil and paint on the fabric, the way that I did with the tulips, instead of cutting each letter out from fabric. It’s a bit difficult to keep the integrity of the letters when they have a lot of points to them. The fabric frays a little bit, which can give it a nice effect, but it wasn’t originally what I was going for.
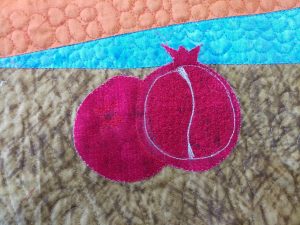
After the background fabric was pieced, it was then time to play with the elements on the quilt. I started with fusing the tree trunk on to the background, and then I top stitched it on with a zigzag stitch, using the invisible thread again. I did the same thing for the large pomegranates at the bottom of the plata cover.
I then fused on a single layer of leaves. I added more layers, making sure never to have 2 unfused leaves over each other. The reason that I did it this way was because I wanted to make sure that each leaf got enough of its own heat to stick to the background fabric. I did not take this down with stitching – I left that for the quilting that I did later.
I put the plata cover down on a place that I could iron on directly and very, very carefully place the letter down where I wanted them. (Actually it was where my daughter wanted them – she has a very good eye for that.) I then, very carefully, fused on the letter, holding my breath as I did it.
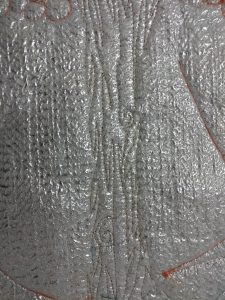 A while back, while I was at Pissot, I saw polytherm fleece batting. It’s polyester batting that has a side that is nice and shiny. That’s the metallic side is a bit of insulation.
With the metallic side facing down, I put my plata top on the batting and pinned. I decided not to put the backing on just yet. The main reason that I decided to do it that way was because I am still having issues with my sewing machine, and I didn’t think it would play nicely with the extra fabric. I had a hard enough time going through the layers that were there, so adding another one, where the stitches were exposed to the world, was really not an option.
 The first thing that needed to be done was set all the fused but not top stitched pieces in place. The lettering came first, because I was more concerned about any shifting that might happen. With matching thread, I carefully sewed down each letter. This time I free motion quilted it. I used a regular straight stitch instead of the zigzag. There were a lot of thin parts to the letters and I didn’t want the stitches to overwhelm them.
Next were the leaves. I chose a bit darker thread for leaves than the actual green of the fabric so it would show up a bit more. I traced each leaf and put a center vein in them thread.
Dealing with each of the different background areas came next. I didn’t want to quilt too much because I wanted the piecing to be the focal point. To make the orange look more like mountains, I put pebbles at the bottom of them and then put mountain paths in to give it more dimension. I marked those paths with chalk before I started quilting. I didn’t need to follow them exactly, but I wanted to get an general feel of how it would look before I started.
In the water, I quilted a wave pattern. In the sky I quilting some cloud shapes. In the ground area, I quilted a grass design. And in the bark, I quilted a bark design.
The two pomegranates at the bottom got special detail. I used thread to make the white of the pomegranate instead of using fabric and with read thread, used small pebbles to make the individual seeds.
After the quilting was done, it was time to put on the backing of the quilt. For this, instead of using the standard quilter’s cotton, I bought flame resistant fabric. It only came in black, so black was the color I choose. I guess that’s a good thing – if it singes, it won’t show.
Standard plata covers are 31″ x 26″, so I cut out a piece of fabric that was 32″ x 27″ inches, so that it would include a 1/2″ seam allowance.
I placed the back on to of the front, right sides facing each other, and sew around the plata cover, leaving about 6″ on one side so that I could pull out the top. To make the corners come to points, I snipped a bit of the fabric away from the corners. I then pulled the front through the hole that I left and worked the corners to points. To do this, you can use a chop stick.
The last piece is to sew around the cover, as close to the edge as possible, sealing it all close.
And then, voila! Plata cover finish. I am extremely please with how this came out. I’m going to have to go back to Pissot to get more of the polytherm fleece so that I can make some more. It was a lot of fun! I hope my cousins like it!
Both of my daughters were instrumental in the design of this plata cover. I want to thank them so much for their help!
עברית למטה Hi Quilters! I know it’s been a really long time since I’ve posted anything. It’s been a hard, sad, scary and crazy year

עברית למטה Wow! What a year it’s been. It’s hard to believe that Rosh Hashana is here already. How exciting! There are so many things
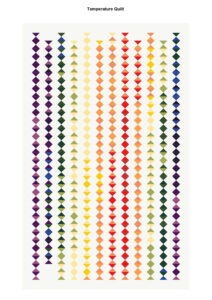
עברית למטה As the year ends and the temperature drops it’s time to think about making a temperature quilt. It’s more fun to quilt when